Ever bite into a homegrown strawberry, only to be disappointed by a tart or bland flavor? You're not alone! Achieving that perfect, intensely sweet strawberry flavor requires a bit of know-how and attention to detail. The good news is, with the right strategies, you can significantly enhance the sweetness of your strawberries right in your own garden. Let's explore the secrets to growing irresistibly sweet strawberries. Understanding Strawberry Sweetness Before diving into the "how-to," it's crucial to understand what contributes to a strawberry's sweetness. The sweetness we perceive comes primarily from sugars, specifically fructose, glucose, and sucrose. The balance of these sugars, along with the acidity of the fruit, determines the overall taste. Factors like sunlight, water availability, soil composition, and variety all play significant roles in influencing sugar production and acidity levels within the strawberry fruit. Unders...
Ever dreamt of plucking a juicy, sun-ripened strawberry straight from your own little garden patch? The Buzzy Strawberry Grow Kit makes that dream surprisingly accessible, even if you're a complete beginner. But before you dive in headfirst and potentially overwhelm your little strawberry seedlings, let's break down the Buzzy Strawberry Grow Kit Directions and set you up for strawberry-growing success!
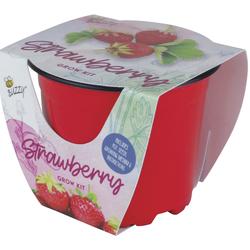
Understanding Your Buzzy Strawberry Grow Kit
The first step to enjoying your own homegrown strawberries is understanding what exactly comes inside your Buzzy Strawberry Grow Kit. Typically, a Buzzy Strawberry Grow Kit contains the essentials you need to start your strawberry-growing journey. This often includes:
- A small container or pot
- A soil pellet or growing medium
- Strawberry seeds (usually everbearing varieties)
- And, of course, the Buzzy Strawberry Grow Kit directions themselves!
It's important to note that different kits may vary slightly. Always check the packaging to confirm the specific contents of your kit. Once you've confirmed you have the contents of the kit, make sure to start with the directions.
Detailed Buzzy Strawberry Grow Kit Directions: A Step-by-Step Guide
Let’s go through those Buzzy Strawberry Grow Kit Directions step-by-step to ensure your strawberry seeds get the best possible start. This guidance is applicable even if the kit is missing the physical direction guide.
Step 1: Preparing the Growing Medium
Most Buzzy kits include a dehydrated soil pellet. This is super convenient! To prepare it, you'll need to rehydrate it. Place the soil pellet in the provided container or pot. Slowly add water, usually warm water is best, according to the Buzzy Strawberry Grow Kit directions (often around ½ cup or as specified on the packaging). Watch as the pellet expands, absorbing the water and transforming into a loose, usable growing medium. Break up any large clumps with your fingers until you achieve a fairly even consistency. Make sure the soil is moist, but not waterlogged. Too much water can lead to rotting, which can lead to fungus gnats, which can cause even more problems. Now, prepare your soil like you are preparing your life.
Step 2: Sowing the Strawberry Seeds
Now comes the exciting part – planting your strawberry seeds! Buzzy Strawberry Grow Kit Directions often suggest scattering the seeds evenly over the surface of the prepared soil. Strawberry seeds are quite small, so try your best to space them out slightly to avoid overcrowding. Once scattered, gently press the seeds into the soil, but don't bury them too deeply. A light dusting of soil is usually sufficient. Remember, these seeds need light to germinate! Here are a few tips for optimizing growth:
- Seed Spacing: Aim for at least 1/4 inch between seeds.
- Depth: Don't bury seeds more than 1/8 inch deep.
- Gentle Touch: Be careful not to damage the delicate seeds.
Step 3: Creating the Ideal Germination Environment
Strawberry seeds need warmth and moisture to germinate successfully. A great way to achieve this is by creating a mini-greenhouse effect. You can do this by covering the container with a plastic bag or plastic wrap. This helps to trap moisture and maintain a consistent temperature. Place the container in a warm location that receives indirect sunlight. Direct sunlight can scorch the seeds. Optimal germination temperature is between 70-75°F (21-24°C). If you have a heat mat, you can also place the container on top of it to further increase germination speed.
Step 4: Monitoring and Watering
Check the moisture level of the soil daily. The soil should remain consistently moist, but not soggy. If the soil feels dry to the touch, gently mist it with water using a spray bottle. Avoid overwatering, as this can lead to fungal diseases and prevent germination. Once the seedlings emerge, you can gradually remove the plastic covering over a period of a few days to acclimate them to the ambient humidity.
Step 5: Providing Light and Nutrients
Once your strawberry seedlings have sprouted (usually within 1-3 weeks, but this can vary depending on the variety and environmental conditions), they will need plenty of light to thrive. Place the container in a location that receives at least 6-8 hours of direct sunlight per day. If you don't have access to a sunny location, you can supplement with a grow light.
Also, consider using a fertilizer once they grow a bit bigger.
Step 6: Transplanting (If Necessary)
The Buzzy Strawberry Grow Kit directions and its provided container is often small, transplanting your strawberry plants may become necessary as they grow larger. When the seedlings have developed several sets of true leaves, and the roots are starting to outgrow the container, it's time to transplant them into larger pots or directly into your garden. When transplanting, be very gentle with the delicate roots. Dig a hole that is large enough to accommodate the root ball and carefully place the seedling into the hole. Backfill with soil and gently pat it down. Water thoroughly after transplanting. Strawberries need well-draining soil and plenty of space to spread out.
Troubleshooting Common Issues with Your Buzzy Strawberry Grow Kit
Even with the best Buzzy Strawberry Grow Kit Directions, things don't always go according to plan. Here are some common issues you might encounter and how to address them:
- No Germination: Possible causes include old seeds, improper watering (too much or too little), or insufficient warmth. Ensure your seeds are fresh and that you're maintaining consistent moisture and temperature.
- Mold Growth: This is often a sign of overwatering. Reduce watering and ensure good air circulation. You may also need to treat the affected area with a fungicide.
- Leggy Seedlings: This indicates that the seedlings are not receiving enough light. Move them to a brighter location or supplement with a grow light.
- Pests: Aphids and spider mites can sometimes attack strawberry plants. Regularly inspect your plants and treat any infestations with insecticidal soap.
Beyond the Kit: Growing Strawberries Long-Term
The Buzzy Strawberry Grow Kit is a fantastic way to get started, but for long-term strawberry production, you'll need to consider a few more things. Here are some things to think about:
- Choosing the Right Strawberry Variety: There are three main types of strawberries: June-bearing, everbearing, and day-neutral. June-bearing varieties produce one large crop in the spring, while everbearing and day-neutral varieties produce fruit throughout the growing season.
- Soil Preparation: Strawberries prefer well-drained, slightly acidic soil. Amend your soil with compost or other organic matter to improve drainage and fertility.
- Fertilizing: Strawberries benefit from regular fertilization. Use a balanced fertilizer specifically formulated for strawberries, following the instructions on the label.
- Pruning: Prune your strawberry plants regularly to remove dead or diseased leaves and runners. This will help to improve air circulation and prevent disease.
- Winter Protection: In colder climates, protect your strawberry plants from frost and freezing temperatures by covering them with straw or burlap.
Growing your own strawberries can be an incredibly rewarding experience. With a little patience, care, and the help of your Buzzy Strawberry Grow Kit Directions, you'll be enjoying fresh, homegrown strawberries in no time!
Speaking of keeping your garden organized, a great addition to any gardener's arsenal is the Keomaisyto Garden Tool Organizer With Basket. This 3-tier yard storage rack is perfect for keeping your tools neat and tidy in the shed or garage. With 35 slots for long-handled tools, you'll never have to search for your rake or shovel again! This wonderful gardening tool shelf will keep your gardening equipment organized. Check it out on Amazon: Keomaisyto Garden Tool Organizer!