Ever bite into a homegrown strawberry, only to be disappointed by a tart or bland flavor? You're not alone! Achieving that perfect, intensely sweet strawberry flavor requires a bit of know-how and attention to detail. The good news is, with the right strategies, you can significantly enhance the sweetness of your strawberries right in your own garden. Let's explore the secrets to growing irresistibly sweet strawberries. Understanding Strawberry Sweetness Before diving into the "how-to," it's crucial to understand what contributes to a strawberry's sweetness. The sweetness we perceive comes primarily from sugars, specifically fructose, glucose, and sucrose. The balance of these sugars, along with the acidity of the fruit, determines the overall taste. Factors like sunlight, water availability, soil composition, and variety all play significant roles in influencing sugar production and acidity levels within the strawberry fruit. Unders...
Have you ever stumbled upon a plant that looks like it belongs in a fairytale? One with vibrant green leaves like spinach and adorned with bright red, juicy-looking berries? Well, that's strawberry spinach for you, and it's surprisingly easy to grow from seed! Get ready to learn how to cultivate this unique and delicious addition to your garden.
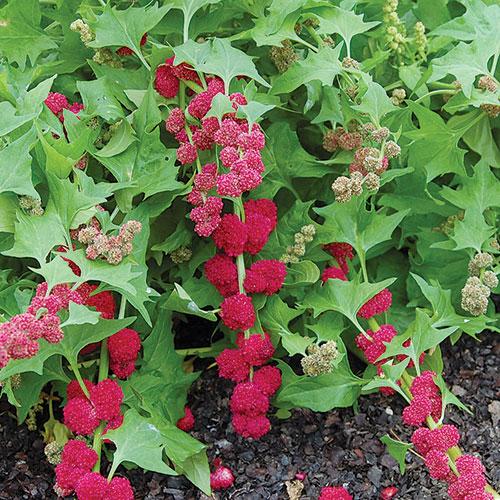
What is Strawberry Spinach?
Strawberry spinach, also known as Beta vulgaris subsp. cicla, is a fascinating leafy green that's both ornamental and edible. It's not actually related to strawberries or spinach, despite the name. This plant is an ancestor of beets and Swiss chard, hence its botanical name. The "strawberries" are actually red berry-like fruits that grow along the stem at the leaf axils. While not as sweet as true strawberries, they have a mild, slightly earthy flavor and add a beautiful pop of color to salads and other dishes.
Unlike traditional spinach, strawberry spinach tends to be more heat-tolerant, making it a great option for gardeners in warmer climates. It's also relatively low-maintenance and can be grown in containers or directly in the ground. Strawberry spinach is a powerhouse of nutrients, offering vitamins A and C, iron, and antioxidants.
Why Grow Strawberry Spinach From Seed?
Growing strawberry spinach from seed gives you complete control over the growing process, from selecting the right variety to ensuring optimal growing conditions. Starting with seeds is also a cost-effective way to cultivate a large number of plants, especially if you plan to use strawberry spinach regularly in your kitchen or share it with friends and neighbors. Here are more compelling reasons to start with seeds:
- Variety Selection: You have access to a wider range of strawberry spinach varieties when starting from seed. Some varieties might be more suited to your local climate or offer different flavor profiles.
- Cost Savings: Seeds are much more affordable than buying established seedlings, especially if you want to grow a large patch of strawberry spinach.
- Acclimation: Plants grown from seed tend to be better acclimated to your specific growing conditions, making them more resilient to pests, diseases, and environmental stress.
- Organic Control: Growing from seed allows you to use organic and sustainable practices from the very beginning, ensuring that your strawberry spinach is free from harmful chemicals.
- The Joy of Gardening: There's something incredibly rewarding about nurturing a plant from a tiny seed to a thriving, fruit-bearing specimen. Growing from seed is an excellent way to connect with nature and learn about the life cycle of plants.
How to Grow Strawberry Spinach From Seed: A Step-by-Step Guide
Growing strawberry spinach from seed is a rewarding experience, and with the right guidance, you can have a bountiful harvest of delicious and beautiful leaves and berries. Let's dive into the step-by-step process.
Step 1: Gathering Your Supplies
Before you start, gather all the necessary supplies. This will streamline the planting process and ensure that you have everything you need at your fingertips.
- Strawberry Spinach Seeds: Purchase high-quality seeds from a reputable supplier. Look for varieties that are well-suited to your climate.
- Seed Starting Trays or Pots: Choose trays or pots with good drainage. Peat pots, coir pots, or plastic trays are all suitable options.
- Seed Starting Mix: Use a lightweight, sterile seed starting mix to provide the best environment for germination. Avoid using garden soil, as it can be too heavy and may contain pathogens.
- Watering Can or Spray Bottle: Gentle watering is essential to avoid disturbing the delicate seedlings.
- Heat Mat (Optional): A heat mat can help speed up germination, especially in cooler climates.
- Grow Lights (Optional): If you're starting seeds indoors, grow lights will provide the necessary light for healthy seedling development.
Step 2: Starting the Seeds Indoors (Recommended)
Starting seeds indoors gives you a head start on the growing season and allows you to control the growing environment. This is particularly beneficial if you live in an area with a short growing season or unpredictable weather.
- Sow the Seeds: Fill your seed starting trays or pots with seed starting mix. Moisten the mix thoroughly with water, but avoid making it soggy. Sow the strawberry spinach seeds about 1/4 inch deep and 1 inch apart.
- Provide Warmth and Light: Place the trays or pots in a warm location, ideally between 60-70°F (15-21°C). If using a heat mat, place it underneath the trays. If you don't have a heat mat, a warm windowsill or a spot near a radiator can work. Provide ample light by placing the trays under grow lights or in a sunny window.
- Keep the Soil Moist: Monitor the soil moisture regularly and water gently whenever the top inch of soil feels dry. Use a spray bottle or watering can with a fine nozzle to avoid disturbing the seeds or seedlings.
- Germination: Strawberry spinach seeds typically germinate within 7-14 days. Once the seedlings emerge, continue to provide adequate light and water.
Step 3: Transplanting the Seedlings
Once the seedlings have developed a few sets of true leaves (usually 4-6 weeks after germination), they're ready to be transplanted into larger pots or directly into the garden. Hardening off the seedlings is crucial to acclimate them to outdoor conditions.
- Hardening Off: Gradually expose the seedlings to outdoor conditions over a period of 7-10 days. Start by placing them in a sheltered location for a few hours each day, gradually increasing the amount of time they spend outdoors. Protect them from direct sunlight, strong winds, and frost.
- Preparing the Soil: Choose a location in your garden that receives at least 6 hours of sunlight per day. Strawberry spinach prefers well-drained soil that is rich in organic matter. Amend the soil with compost or well-rotted manure to improve its fertility and drainage.
- Transplanting: Dig holes that are slightly larger than the root balls of the seedlings. Gently remove the seedlings from their pots and place them in the holes. Space the plants about 12-18 inches apart to allow for adequate growth. Backfill the holes with soil and water thoroughly.
Tired of your garden tools cluttering your garage or shed? Consider investing in the Keomaisyto Garden Tool Organizer With Basket, a 3-tier yard storage rack that keeps your long-handled tools neatly organized. This heavy-duty holder features 35 slots, making it perfect for shovels, rakes, and other gardening essentials. You can find it on Amazon here: Keomaisyto Garden Tool Organizer With Basket.
Step 4: Caring for Your Strawberry Spinach Plants
Once your strawberry spinach plants are established in the garden, providing proper care will ensure a bountiful harvest. Here's what you need to know:
- Watering: Water regularly, especially during dry periods. Aim to keep the soil consistently moist, but avoid overwatering, which can lead to root rot.
- Fertilizing: Strawberry spinach benefits from regular feeding with a balanced organic fertilizer. Apply the fertilizer according to the package instructions.
- Mulching: Apply a layer of mulch around the plants to help retain moisture, suppress weeds, and regulate soil temperature. Organic mulches like straw, hay, or wood chips are excellent choices.
- Weeding: Keep the garden bed free of weeds, which can compete with the strawberry spinach plants for nutrients and water. Hand-pull weeds regularly or use a hoe to cultivate the soil.
- Pest and Disease Control: Strawberry spinach is relatively resistant to pests and diseases, but it's still important to monitor the plants regularly for any signs of problems. Common pests include aphids and flea beetles, which can be controlled with insecticidal soap or neem oil. Diseases like downy mildew can be prevented by providing good air circulation and avoiding overhead watering.
Step 5: Harvesting Your Strawberry Spinach
Harvesting your strawberry spinach is the most rewarding part of the process. You can start harvesting the leaves as soon as they are large enough to eat, usually about 4-6 weeks after transplanting. The "strawberries" will be ready to harvest when they are bright red and slightly soft to the touch.
- Harvesting Leaves: Cut the outer leaves with scissors or a knife, leaving the inner leaves to continue growing. Regular harvesting will encourage the plant to produce more leaves.
- Harvesting "Strawberries": Gently pluck the red berry-like fruits from the stem. They are best eaten fresh, but can also be used in jams, jellies, or baked goods.
Tips for Success When Growing Strawberry Spinach From Seed
Here are some additional tips to ensure a successful strawberry spinach harvest:
- Choose the Right Location: Strawberry spinach needs at least 6 hours of sunlight per day to thrive. Select a location in your garden that receives ample sunlight.
- Improve Soil Drainage: Strawberry spinach prefers well-drained soil. If your soil is heavy clay, amend it with compost, sand, or other organic matter to improve its drainage.
- Succession Planting: Plant strawberry spinach seeds every few weeks to ensure a continuous harvest throughout the growing season.
- Companion Planting: Plant strawberry spinach alongside beneficial companion plants like basil, garlic, or onions. These plants can help deter pests and improve the overall health of your garden.
- Protect from Frost: Strawberry spinach is relatively frost-tolerant, but it can be damaged by hard frosts. Cover the plants with a frost blanket or move them indoors if a frost is predicted.
Troubleshooting Common Problems When You Grow Strawberry Spinach From Seed
Even with the best care, you may encounter some challenges when growing strawberry spinach. Here are some common problems and how to address them:
- Poor Germination: If your strawberry spinach seeds aren't germinating, make sure the soil is consistently moist and the temperature is warm enough. You can also try scarifying the seeds by gently rubbing them with sandpaper before planting.
- Leggy Seedlings: Leggy seedlings are tall and spindly with weak stems. This is usually caused by insufficient light. Provide more light by moving the seedlings closer to a window or using grow lights.
- Yellowing Leaves: Yellowing leaves can be a sign of nutrient deficiency. Amend the soil with compost or fertilizer to provide the plants with the nutrients they need.
- Pest Infestations: Monitor your plants regularly for pests like aphids, flea beetles, and slugs. Control pests with insecticidal soap, neem oil, or diatomaceous earth.
Enjoying Your Harvest of Strawberry Spinach
Now that you've successfully grown strawberry spinach from seed and harvested your bounty, it's time to enjoy the fruits (and leaves!) of your labor. Here are some ideas for using strawberry spinach in your kitchen:
- Salads: Add the leaves and "strawberries" to salads for a burst of color and flavor.
- Smoothies: Blend the leaves into smoothies for a nutritional boost.
- Sauteed Greens: Saute the leaves with garlic and olive oil for a simple and delicious side dish.
- Soups and Stews: Add the leaves to soups and stews for added flavor and nutrients.
- Jams and Jellies: Use the "strawberries" to make jams and jellies.
- Garnish: Use the leaves and "strawberries" as a garnish for a variety of dishes.
Growing strawberry spinach from seed is a rewarding experience that will add beauty and flavor to your garden and kitchen. With the right knowledge and care, you can enjoy a bountiful harvest of this unique and delicious plant. So, grab your seeds, get your hands dirty, and start growing today!